
In This Article
Battle at a Glance
The Yost Post · Battlefield Dossier
Lexington & Concord
April 19, 1775 · Massachusetts Bay
A British expedition becomes the opening battle of the American Revolution
British regulars marched from Boston to Concord to seize or destroy colonial military supplies. Warned of their approach, Massachusetts militia mobilized, fought at Lexington and Concord, and attacked the British during their withdrawal.
- Date
- April 19, 1775
- Campaign
- Opening of the American Revolutionary War
- Location
- Lexington, Concord and the road toward Charlestown, Massachusetts
- Duration
- Approximately 5:00 a.m.–7:30 p.m.
- British Command
- Lt. Col. Francis Smith · Brig. Gen. Hugh Percy
- Colonial Leaders
- John Parker · James Barrett · John Buttrick · William Heath
- British Strength
- Approximately 700 initially; 1,700 with relief
- Colonial Participation
- More than 4,000 throughout the day
British Objective
Locate and destroy colonial military stores at Concord and return the expedition safely toward Boston.
Colonial Objective
Mobilize local militia, resist the expedition and defend colonial military preparations.
Major engagements: Lexington Green, North Bridge, Meriam’s Corner, Bloody Angle, Parker’s Revenge, Fiske Hill and Menotomy.
Terrain: Village common, river crossings, narrow roads, wooded hills, stone walls and roadside buildings.
National Park Service figures. Other published sources report 93 colonial casualties.
British withdrawal under sustained militia attack.
Colonial militia mobilized across numerous towns and gathered around Boston, beginning the siege and transforming a political confrontation into open war. Percy’s relief force helped prevent the destruction of Smith’s expedition.
Overview
On April 19, 1775, British regulars marched into the Massachusetts countryside to locate and destroy military supplies assembled by the colonial resistance at Concord. Warned of the expedition, militia companies began mobilizing before the regulars reached their objective. A confrontation at Lexington Green left eight colonial militiamen dead. At Concord’s North Bridge, colonial forces advanced against a British detachment and returned its fire. During the subsequent British withdrawal, militia from surrounding communities attacked the marching column at successive locations along the road toward Boston.
The fighting was not a single battle fought between two armies on one field. It was a sequence of engagements involving different commanders, formations, terrain and tactical circumstances. The British expedition began as an operation against military supplies and ended in a difficult fighting withdrawal supported by reinforcements under Brigadier General Hugh Percy.
The National Park Service reports 273 British casualties: 73 killed, 174 wounded and 26 missing. Its colonial total is 95: 49 killed, 41 wounded and 5 missing. The Boston Public Library and Gilder Lehrman Institute give a colonial total of 93, reflecting 39 rather than 41 wounded. These differing historical totals should not be silently combined.
Historical Background: Massachusetts on the Brink of War
The Breakdown of Royal Government
By the spring of 1775, the constitutional dispute between Great Britain and its North American colonies had become an increasingly dangerous struggle over political authority and military power. The closing of Boston’s port and the Massachusetts Government Act had intensified resistance to parliamentary policy. General Thomas Gage, the royal governor and commander of British forces in Massachusetts, confronted a population whose elected and extralegal political leaders were organizing resistance outside the effective control of royal government.
After Gage dissolved the elected legislature, colonial representatives established the Massachusetts Provincial Congress. Meeting in October 1774, it began organizing military preparations, including the collection of weapons, ammunition and provisions. The Provincial Congress sought to establish a force capable of responding quickly if British troops moved against the countryside.
Why Concord?
Concord had become an important collection point for colonial military supplies. British authorities sought to prevent these stores from supporting organized resistance. The expedition ordered by Gage was therefore intended to locate and destroy military matériel, not to conquer and permanently occupy Concord.
The British command faced an operational dilemma. A rapid, discreet movement might reach the supplies before the militia could assemble. A delayed or widely detected expedition risked encountering armed resistance on both the outward and return journeys.
The Hancock–Clarke House
Two prominent Patriot leaders, John Hancock and Samuel Adams, were staying at the Lexington home of Reverend Jonas Clarke on the night of April 18. The presence of these men gave the approaching expedition additional political significance. Patriot leaders feared that British military movements might threaten them, although the documented objective of the Concord expedition concerned military stores. Fears of arrest should not be confused with a verified order to seize Hancock and Adams.
Paul Revere and William Dawes carried warnings toward Lexington. Their mission helped alert Hancock and Adams and contributed to the wider network of communication that brought militia companies into motion.
Related biography: John Hancock.
Commanders & Participating Forces
The forces engaged on April 19 changed substantially throughout the day. The initial British expedition numbered approximately 700 men, principally selected grenadier and light-infantry companies. Additional regulars under Percy later increased British strength to approximately 1,700. Colonial militia companies arrived independently from numerous towns, with more than 4,000 men participating at various stages of the fighting according to the National Park Service.
British Command
| Commander | Role | Operational significance |
|---|---|---|
| General Thomas Gage | British commander in Massachusetts | Authorized the expedition against Concord’s military supplies |
| Lt. Col. Francis Smith | Expedition commander | Directed the initial march, search operation and early withdrawal |
| Major John Pitcairn | British marine officer | Associated with the advance and confrontation at Lexington |
| Captain Walter Laurie | Light-infantry officer | Commanded the British detachment at North Bridge |
| Brig. Gen. Hugh Percy | Relief-force commander | Brought reinforcements and artillery and organized the later withdrawal |
Colonial Leadership
| Commander | Role | Operational significance |
|---|---|---|
| Captain John Parker | Lexington militia | Commanded the company assembled on Lexington Green |
| Colonel James Barrett | Concord militia leader | Directed colonial forces during the Concord operation |
| Major John Buttrick | Concord militia officer | Led the advance at North Bridge and ordered return fire |
| Colonel William Heath | Massachusetts militia leader | Helped coordinate colonial forces during the British withdrawal |
| Dr. Joseph Warren | Patriot political and military leader | Helped organize warnings and later joined the retreat-road fighting |
For biographical context, see Captain John Parker and Joseph Warren.
British Formations
British grenadiers were selected infantrymen commonly associated with physical stature and steadiness. Light infantry were trained for mobility, scouting, advance-guard duties and fighting in dispersed formations. Their training included the use of cover and movement outside rigid parade-ground formations.
This distinction is essential to understanding the battle. British regulars were not incapable of adapting to irregular fighting. Their officers deployed flankers, attacked militia positions and used artillery. The challenge was maintaining an extended column, protecting wounded men and completing a long withdrawal against increasing opposition.
Colonial Militia and Minute Companies
Massachusetts militia organizations drew upon local communities. Some men belonged to minute companies expected to assemble rapidly; others served in ordinary militia formations. These forces did not begin the day as one unified field army. They responded to alarms, marched from different towns and entered the fighting at different times.
The local organization of these companies gave them knowledge of roads and surrounding terrain. Their commanders also possessed varying levels of military experience. The effectiveness of the colonial response depended on communication, mobilization and the ability of separate companies to converge upon the British route.
Battlefield Geography & Terrain
The geography of eastern Massachusetts shaped every stage of the expedition. Lexington Green, Concord’s North Bridge and the roads connecting the towns presented different tactical problems. The British force had to travel outward from Boston, search dispersed locations around Concord and then return through countryside where militia were assembling.
Lexington Green
The open common offered little protection to Parker’s smaller militia company. The British approach placed a much larger force near a visibly assembled body of armed colonists.
Concord’s North Bridge
The bridge and its approaches restricted frontage. Forces approaching the crossing could not employ their full numbers simultaneously.
Meriam’s Corner
A narrow crossing and road alignment created conditions in which the British marching formation became vulnerable to fire from the surrounding terrain.
Bloody Angle and Fiske Hill
Bends in the road, elevated ground, woods and adjoining fields provided positions from which militia could threaten the column.
Menotomy
Buildings, walls and roadside cover complicated British security and contributed to particularly destructive fighting.
The Return Route
The long withdrawal imposed increasing demands on ammunition, marching endurance, command coordination and the evacuation of wounded soldiers.
Terrain descriptions establish tactical possibilities, but exact unit positions require maps, contemporary accounts and battlefield studies. The diagrams below are conceptual and are not presented as precise reconstructions.
Weapons, Equipment & Logistics
British Weapons and Training
British infantry principally carried smoothbore flintlock muskets fitted with bayonets. Military drill emphasized loading, controlled firing, formation movement and close-order discipline. Light infantry also trained for more flexible movements, including reconnaissance and dispersed fighting.
Musket fire was constrained by limited accuracy, smoke, loading time and the difficulty of identifying targets under battlefield conditions. Bayonets provided an important close-combat advantage, especially against opponents who lacked equivalent equipment.
Colonial Arms
Colonial militia carried a mixture of privately owned and publicly supplied firearms, predominantly smoothbore muskets and other shoulder arms. Equipment was not uniform across companies. The popular image of every colonial militiaman carrying a long rifle is misleading for the Massachusetts fighting of April 1775.
The Expedition’s Logistical Problem
The British force had to operate at night, travel a considerable distance, search for supplies and then withdraw. Once resistance developed, the expedition faced additional demands: maintaining cohesion, defending the column’s flanks, transporting casualties and conserving ammunition.
Percy’s relief force brought fresh infantry and artillery. His arrival materially improved the ability of the British to resist militia attacks. A detailed secondary narrative also describes difficulties with ammunition supply and the interception of a supply convoy. These particular logistical claims warrant confirmation from contemporary British accounts before being treated as fully established.
Artillery and Counterattacks
The British response during the withdrawal was not entirely defensive. Regulars sometimes attacked militia positions, attempted to turn threatened flanks and employed artillery to protect the column. These actions helped prevent the retreat from becoming a complete destruction of the expedition.
Intelligence & Operational Planning
British Intentions
General Gage intended to strike at colonial military preparations by sending troops to Concord. The expedition’s effectiveness depended in part on surprise. However, the movement of British patrols, preparations in Boston and the colonial intelligence network made secrecy difficult to maintain.
Revere, Dawes and Prescott
On the evening of April 18, Paul Revere crossed the Charles River and rode toward Lexington. William Dawes approached by another route. Both warned colonial leaders and helped spread news of British movements. Samuel Prescott subsequently carried the alarm onward toward Concord after Revere was detained by a British patrol.
Revere’s mission was part of a larger communications network rather than the work of one rider acting alone. His contemporary deposition and later recollections are particularly useful for comparing immediate testimony with retrospective accounts.
Related biography: Paul Revere.
Military Orders Issued During the Alarm
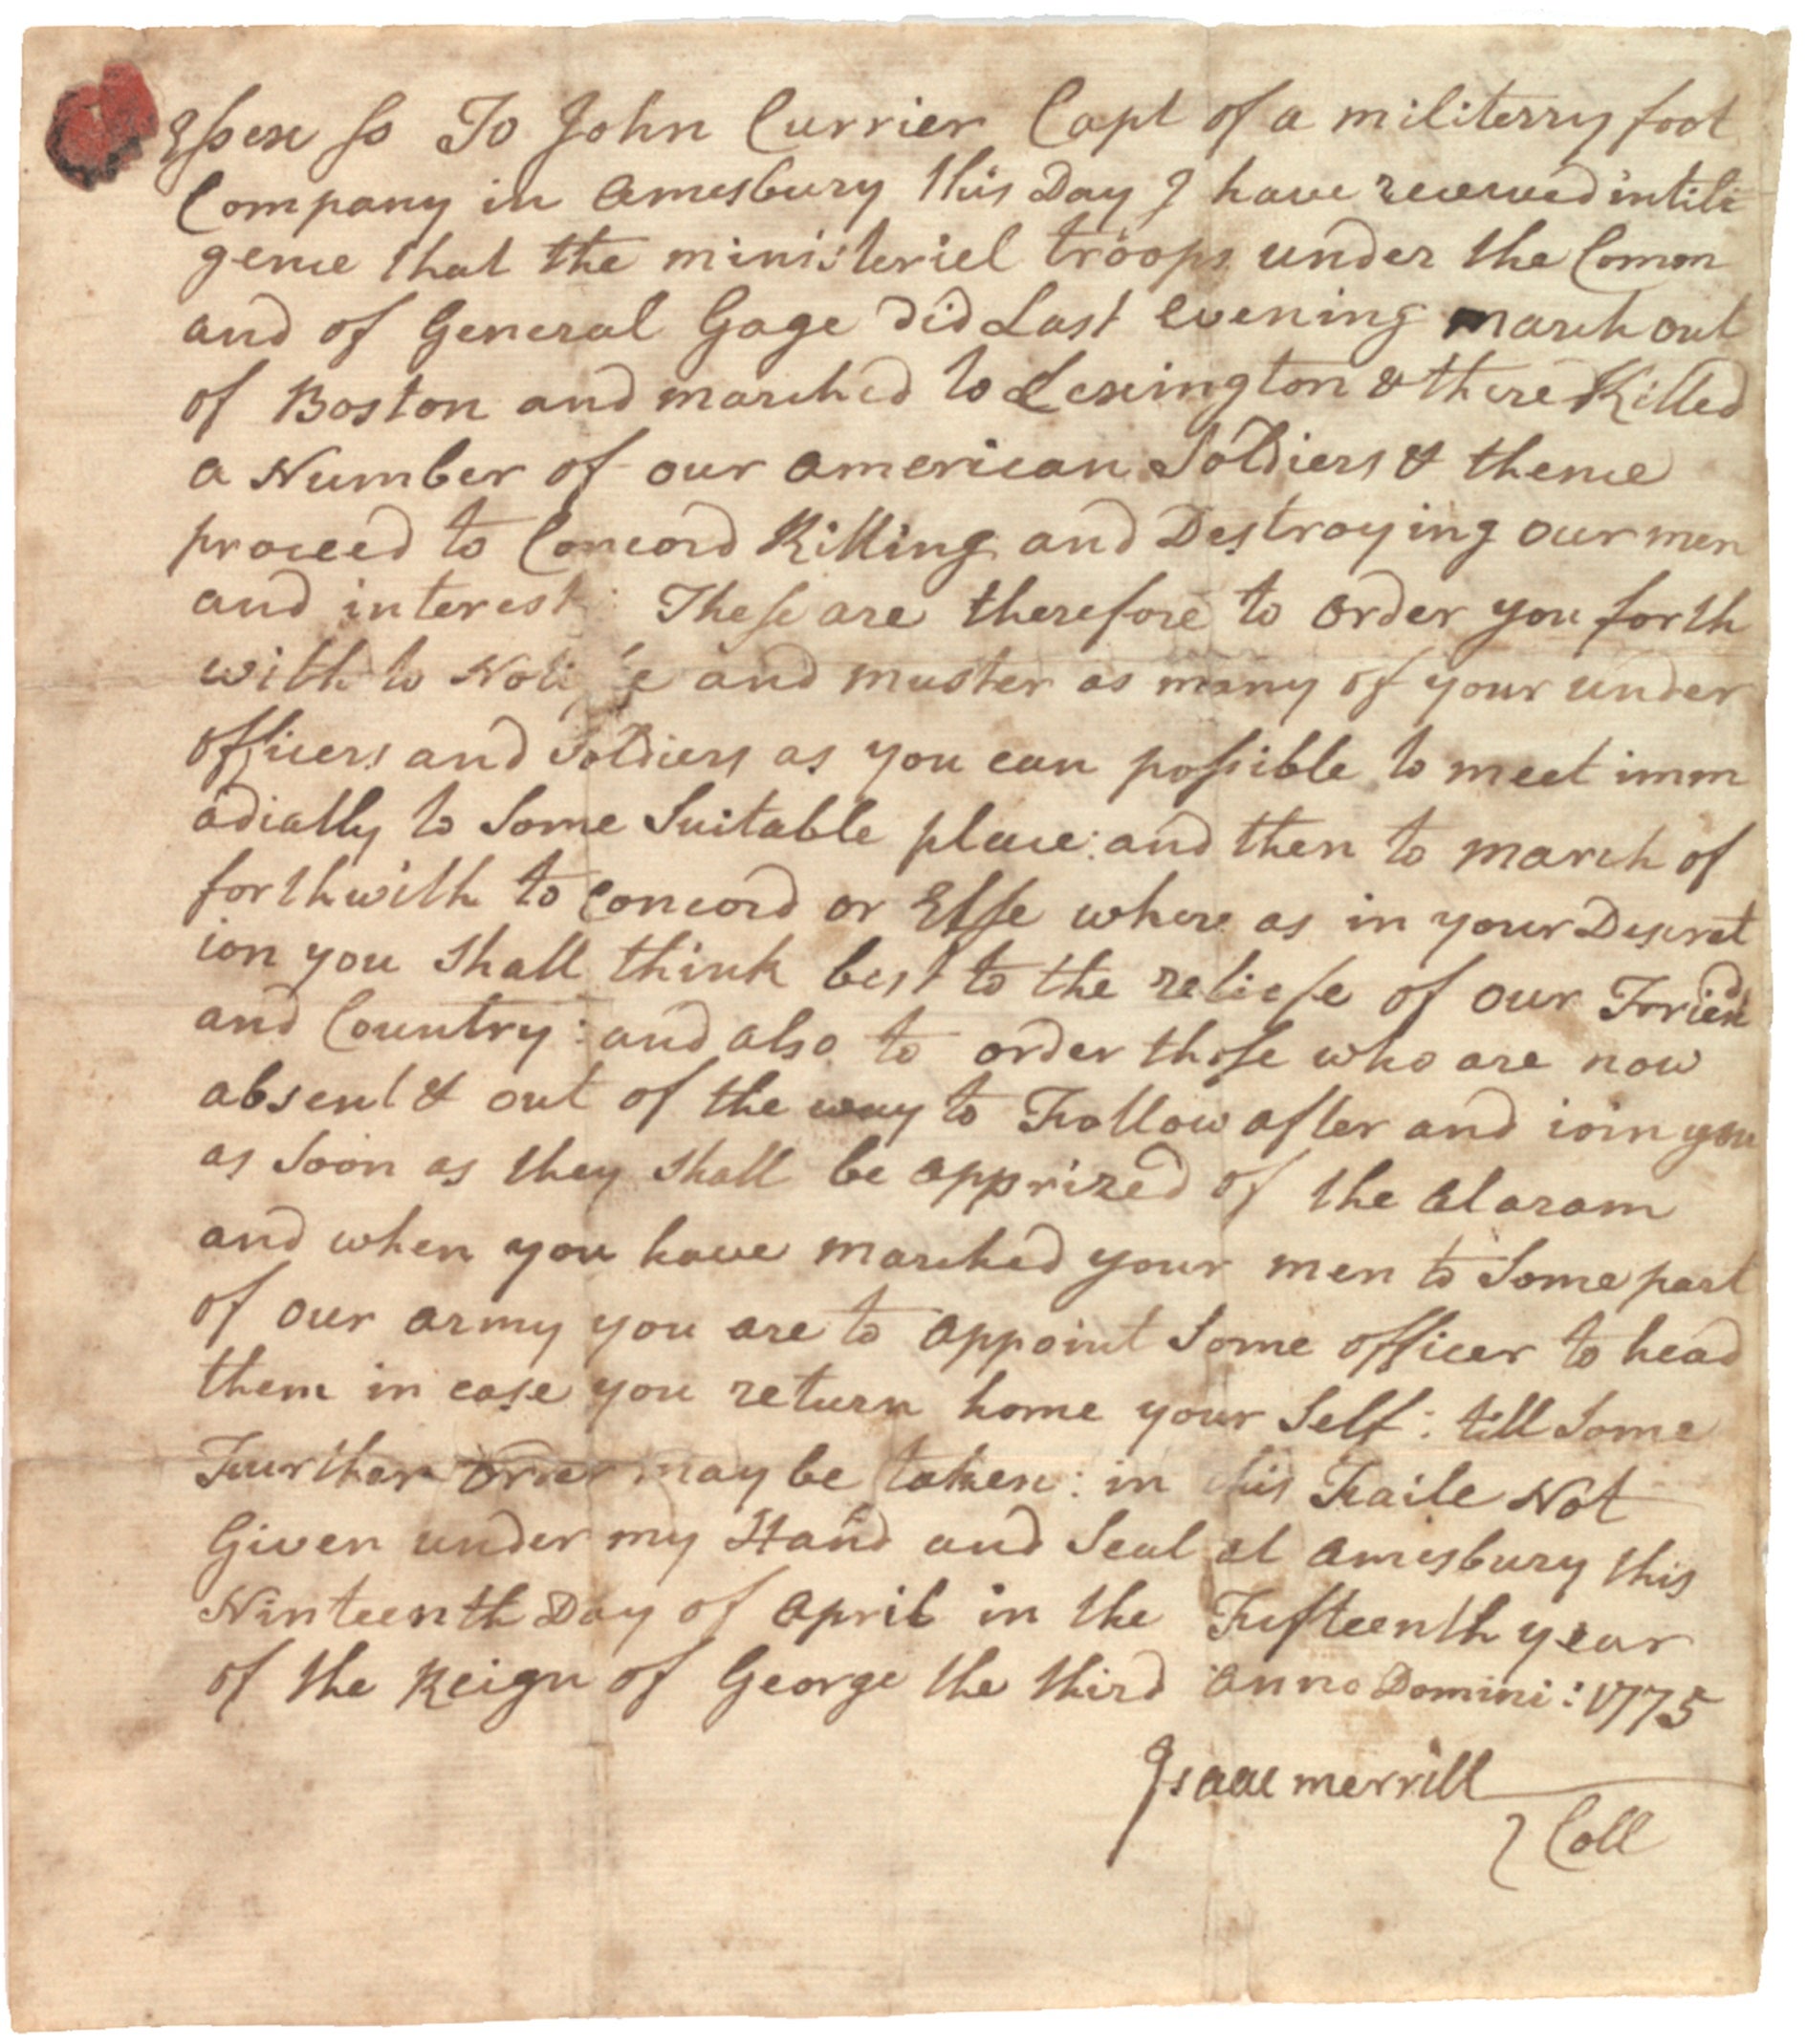
One of the most revealing surviving documents from April 19 is an order issued by Colonel Isaac Merrill to Captain John Currier of Amesbury. Merrill reported receiving intelligence that British troops had marched from Boston and killed colonial soldiers at Lexington before continuing toward Concord.
Merrill instructed Currier to assemble as many officers and soldiers as possible and march toward Concord or another location where they could assist the colonial cause. Men absent at the initial assembly were to follow once notified. Currier was also instructed to appoint a replacement officer if he returned home.
“Mobilize and muster as many of your under officers and Soldiers as you can possible”
The order demonstrates that militia mobilization involved formal command, organized assembly, communication with absent soldiers and provisions for continuity of leadership. It also illustrates the discretion local officers exercised in responding to rapidly changing reports.
The document does not establish when Currier’s company reached the fighting or whether it participated in a particular engagement.
Primary document: Isaac Merrill to John Currier, April 19, 1775 (GLC00303).
The Fog of War
Neither side possessed a complete picture of events as they unfolded. British commanders could not know precisely how many militia were mobilizing along their route. Colonial officers relied on reports carried by riders, local messengers and arriving soldiers. The information contained in contemporary orders must therefore be read as evidence of what officers believed at the time, not necessarily as proof that every reported event occurred exactly as described.
The Battle Unfolds: Interactive Timeline
Expand each entry for the complete narrative of the expedition, battlefield movements, casualties, command decisions and withdrawal. Times are approximate and largely follow the National Park Service chronology.
April 18, 1775
6:30–9:00 p.m. — British patrols and colonial warnings
British mounted patrols are observed along the road toward Lexington. Colonial intelligence networks begin passing warnings about British movements.
10:00–11:00 p.m. — The expedition assembles
During the night of April 18–19, approximately 700 British regulars assembled for the expedition. The force crossed from Boston and began its march toward Concord. Delays, difficult movement and the spread of warnings reduced the advantage that a surprise operation might have provided.
April 19, 1775
12:30 a.m. — Revere and Dawes reach Lexington
Warnings reach Hancock and Adams at the Hancock–Clarke House. The riders’ activity forms part of a broader alarm network.
1:00–2:30 a.m. — Revere is captured; Prescott continues
A British patrol detains Revere. Samuel Prescott carries the alarm onward toward Concord. British regulars continue their march.
3:00–4:30 a.m. — The alarm spreads
British troops pass through Menotomy. Lexington militia are alerted and prepare to assemble.
5:00 a.m. — Fighting at Lexington Green
Captain John Parker assembled approximately 77 Lexington militiamen on the village common. British regulars approached in substantially greater numbers. The encounter was tense, and the precise circumstances surrounding the first shot remain disputed.
British fire killed eight Lexington militiamen and wounded others. Parker’s smaller company could not hold the common against the advancing regulars. The British continued toward Concord.
Parker later provided sworn testimony concerning the encounter. His April 25 deposition is important because it was recorded close to the event, although it must still be compared with other colonial and British accounts.
Related biography: Captain John Parker.
Among the Lexington militiamen wounded was Prince Estabrook, an enslaved Black man serving with Parker’s company. The supplied biography identifies a contemporary casualty list naming Estabrook among the wounded and describes a wound to his left shoulder.
His experience is important both as an individual military record and as evidence of Black participation in the opening fighting of the Revolution. The identification of Estabrook as a casualty establishes a direct connection to Lexington; it does not require inventing an individual combat narrative beyond the surviving evidence.
Related biography: Prince Estabrook.
6:00–7:30 a.m. — Concord prepares for the expedition
The British arrived at Concord around 7:00 a.m. and began searching for military stores. Detachments secured important routes and crossings while other troops moved toward locations where supplies were believed to be stored.
Colonial militia assembled outside the center of town. As their numbers increased, officers considered how to respond to British troops occupying the North Bridge area.
8:00–9:00 a.m. — Search operations and militia advance
British detachments search for supplies, including in the Barrett farm area. Colonial officers decide to advance toward North Bridge.
9:30 a.m. — Battle of North Bridge
Approximately 400 colonial militia advanced toward North Bridge, which was guarded by roughly 90–100 British light infantry. Colonel James Barrett and Major John Buttrick were among the colonial leaders associated with the action. Captain Walter Laurie commanded the British detachment.
As the militia advanced, the British fired. The colonial troops returned fire, and the British detachment withdrew. The engagement demonstrated that organized militia could confront and repel a detachment of regulars under favorable local conditions.
Captain Isaac Davis and Private Abner Hosmer were among the colonial soldiers killed at the bridge.
11:00 a.m.–noon — British forces regroup
After completing its search operations, the British force began withdrawing toward Boston. Militia companies continued arriving from surrounding communities, increasing the number of armed colonists positioned along the route.
12:30 p.m. — Meriam’s Corner
At approximately 12:30 p.m., fighting developed near Meriam’s Corner. The road and crossing constrained the British column, and militia fired upon the regulars as they passed. The engagement marked the beginning of sustained attacks during the withdrawal.
1:00–2:15 p.m. — Brooks Hill, Bloody Angle and Fiske Hill
Sequence: Fighting also occurred at Parker’s Revenge and Fiske Hill as the British withdrew through Lexington.
Further fighting occurred around Brooks Hill and the area commonly called Bloody Angle. Road bends, woods, walls and elevated positions enabled militia to threaten the British column from different directions.
British troops attempted to clear hostile positions and prevent militia from concentrating fire on the marching formation. These counteractions are important evidence that the British were not simply marching passively through a continuous ambush.
Later fighting occurred in the Lexington area, including locations associated with Parker’s Revenge and Fiske Hill. Tradition connects Parker’s Revenge with a renewed attack by Lexington militiamen under Captain Parker. The precise composition and movements of that force require careful comparison of later accounts and contemporary evidence.
At Fiske Hill, British troops faced additional attacks and attempted to protect the withdrawal through countermeasures against militia positions.
Approximately 3:00 p.m. — Percy’s relief force
Brigadier General Hugh Percy brought reinforcements and artillery to Lexington during the afternoon. The fresh troops provided Smith’s exhausted expedition with an organized defensive force and the means to continue the retreat.
Historical timelines differ over the precise arrival time. The National Park Service places Percy’s arrival at approximately 3:00 p.m., while another detailed narrative gives an earlier estimate. This article follows the NPS chronology while recognizing the discrepancy.
3:30–5:30 p.m. — Withdrawal through Menotomy
Fighting continued through Menotomy, where buildings, walls and roadside positions contributed to severe casualties. British troops attacked threatening positions while militia continued firing upon the column.
Colonel William Heath and Dr. Joseph Warren were among the colonial leaders associated with the later stages of the fighting. Percy directed the British toward Charlestown as the expedition approached the protection of British-held positions.
Related biography: Joseph Warren.
6:00–7:30 p.m. — Final movement toward Charlestown
By the evening of April 19, the British had withdrawn toward Charlestown. The National Park Service’s battle chronology ends at approximately 7:30 p.m. Other summaries describe later movements or the arrival of troops at safety using different times. The distinction between the end of active fighting and the final disposition of units should be preserved when interpreting those accounts.
April 20, 1775
The Siege of Boston begins
Colonial forces assemble around Boston in increasing numbers. The fighting has transformed the political crisis into open war.
Tactical Analysis & Command Decisions
The tactical history of April 19 cannot be reduced to a contrast between rigid British formations and irregular colonial marksmen. Both sides used established military practices and adapted to changing conditions. Their effectiveness varied according to terrain, numbers, ammunition, leadership and the demands of the operation.
British Operational Strengths and Weaknesses
The British expedition possessed trained infantry, experienced officers and the ability to employ disciplined formations. Light infantry could scout, protect flanks and operate in dispersed order. The arrival of Percy’s artillery and reinforcements further improved British defensive capabilities.
The central weakness was operational exposure. The force had to travel a long route through increasingly hostile territory. The expedition’s original purpose required searching for dispersed supplies, while its eventual withdrawal required protecting a moving column against militia arriving from multiple directions.
Colonial Operational Strengths and Weaknesses
Colonial militia benefited from local knowledge, rapid communication and the ability to assemble forces near the British route. Roadside terrain allowed relatively small groups to threaten an extended column without engaging the entire British force at once.
However, militia companies varied in training, weapons and leadership. Their arrival was uneven, and they did not begin the day under one unified tactical command. Local success depended on choosing advantageous positions and avoiding unnecessary exposure to concentrated British force.
Lexington: An Unequal Confrontation
At Lexington Green, Parker’s approximately 77 militiamen faced a substantially larger expeditionary force. The open common offered limited defensive protection. Once the confrontation escalated into gunfire, the militia could not maintain its position against the regulars.
The historical question of who fired first remains unresolved. The tactical conclusion is narrower: a small local militia company was exposed to a much larger force under circumstances that made prolonged resistance unlikely.
North Bridge: Restricted Frontage and Local Superiority
At North Bridge, the balance of forces was different. Approximately 400 colonial militiamen advanced toward a British detachment of roughly 90–100 men. The bridge limited the frontage available to the defenders, preventing all their soldiers from firing effectively at once.
Some detailed accounts describe Captain Laurie’s attempt to arrange a street-firing formation and Lieutenant William Sutherland’s efforts to deploy flankers. These specifics require careful comparison with surviving British testimony, but they illustrate the tactical difficulties of defending a narrow crossing against a larger advancing force.
This diagram illustrates restricted frontage and the general direction of the colonial advance. It is not a measured map or a reconstruction of exact historical positions.
Meriam’s Corner: The Vulnerability of a Marching Column
At Meriam’s Corner, the road and crossing constrained the movement of the British force. A column compressed by terrain could not easily deploy every soldier against threats arising from adjoining fields or roadsides.
Colonial militia could engage portions of the column while remaining outside the immediate reach of much of the British force. The resulting tactical problem was not simply a shortage of British discipline; it was the difficulty of defending a long formation in terrain that favored dispersed attackers.
Bloody Angle: Road Geometry and Repeated Attacks
At Bloody Angle, bends in the road and adjacent cover created opportunities for attacks from changing directions. British flankers and counterattacks attempted to deny militia the freedom to occupy positions close to the marching column.
Because the militia did not have to hold a single continuous line, they could reposition as the British passed. The British, by contrast, had to preserve a coherent withdrawal route and protect the movement of their wounded and exhausted soldiers.
Percy’s Relief: Fresh Troops, Artillery and Organized Withdrawal
Percy’s arrival changed the tactical balance. The relief force supplied fresh troops, additional command capacity and artillery. These resources allowed the British to resist militia attacks more effectively and continue moving toward Charlestown.
Detailed accounts describe Percy adjusting his defenses, rotating troops and reinforcing threatened portions of his command. The exact sequence of those maneuvers should be checked against British officer accounts, but the larger operational effect is clear: the relief force prevented Smith’s exhausted expedition from remaining isolated on the return road.
The illustration shows the general problem of defending a marching column against attacks from adjoining terrain. It does not assign particular companies to undocumented positions.
What the Tactical Evidence Demonstrates
The colonial forces exploited local terrain, communication networks and growing numerical strength. British regulars demonstrated tactical adaptability, but the expedition’s original objectives and long return route left it exposed to successive attacks. The outcome arose from the interaction of these factors rather than from a simple superiority of one style of fighting over another.
The Soldier’s Experience
British Regulars
British soldiers began the operation with a night movement from Boston, followed by an extended march and searches around Concord. As the withdrawal developed, they faced repeated attacks, fatigue, smoke, uncertainty and the need to protect wounded comrades.
The experience varied by assignment. Grenadiers, light infantry, flank guards and troops accompanying the main column faced different immediate dangers. Some were required to clear threatening positions; others had to maintain formation and continue moving under fire.
Colonial Militiamen
Colonial soldiers received warnings at different hours and assembled under local officers. Some reached the fighting early; others arrived after the first engagements. Their experience depended on warning time, distance traveled, equipment and commanders’ decisions.
Peter Salem: Responding to the Lexington Alarm
Peter Salem’s military records identify four days of service associated with the Lexington alarm in Captain Simon Edgell’s Framingham minute company. His service connects him directly with the broader colonial mobilization following the British expedition.
The available biography associates his movement with Concord and Cambridge. It does not establish that he fired a weapon at Lexington Green, North Bridge or any particular location during the withdrawal.
Related biography: Peter Salem .
Prince Estabrook: Wounded at Lexington
Prince Estabrook provides a more specific battlefield connection. His name appears in accounts of the Lexington casualties, and the supplied biography identifies him as wounded in the left shoulder while serving in Parker’s militia.
His service illustrates the presence of Black soldiers in the opening events of the Revolution, even as slavery remained part of Massachusetts society.
Related biography: Prince Estabrook .
Captain John Parker: Command Responsibility
Parker had to assemble and direct his company while facing a larger British force. His subsequent deposition is an important contemporary account of the confrontation.
The later tradition of Parker’s Revenge associates him with renewed fighting during the British withdrawal. Specific details should be distinguished from what can be demonstrated through contemporary records.
Related biography: Captain John Parker .
The Civilian Experience
Jonathan Hunnewell later recalled in his pension declaration that he left Boston with his father on April 20, 1775, traveling to Providence, Rhode Island.
His account documents an individual movement immediately after the fighting. It does not establish that he witnessed the battles or explicitly identify the fighting as his reason for departure.
Related biography: Jonathan Hunnewell .
Where Was Your Ancestor’s Unit?
Family historians researching Lexington and Concord must distinguish between service in 1775, participation in the Lexington alarm and documented presence at a particular engagement. A pension declaration written decades later may preserve valuable recollections, but its details should be compared with contemporary muster rolls, pay records and officer returns.
Soldiers and Historical Figures in The Yost Post
| Individual | Connection | Assessment |
|---|---|---|
| Captain John Parker | Commanded Lexington militia; gave sworn deposition | Direct participant |
| Prince Estabrook | Lexington militia; recorded among wounded | Direct participant |
| Joseph Warren | Organized warnings; joined later fighting | Direct involvement |
| Paul Revere | Warning rider; captured by British patrol | Documented alarm activity |
| Peter Salem | Four days of Lexington alarm service | Documented alarm service |
| John Hancock | Warned at Lexington before fighting | Political involvement |
| Jonathan Hunnewell | Recalled leaving Boston on April 20 | Immediate aftermath |
| Ivory Hovey | Later inquiry references Boxford alarm muster roll | Requires verification |
| John Burns | April 19 service date and reported Lexington connection | Battlefield presence unverified |
| John Fadden Jr. | Later testimony associates him with Lexington and Concord | Battlefield presence unverified |
Ivory Hovey and the Boxford Militia
Ivory Hovey’s biography includes a later inquiry referring to a muster roll of Boxford men who marched during the Lexington alarm. The underlying roll has not yet been independently examined for this article.
His name belongs in the research inventory, but his presence at a particular battlefield location cannot yet be stated as fact.
How to Verify an Ancestor’s Participation
Begin by identifying the soldier’s town, company, commanding officer and dates of service. Compare the record with company-level muster rolls and contemporary returns. Determine whether it refers to the alarm, the march to Cambridge, later siege service or a specific engagement.
When using pension declarations, distinguish the veteran’s statements from later family testimony and administrative summaries. Service in April 1775 does not automatically establish participation in the fighting on April 19.
A soldier’s name on a Revolutionary War roll is not sufficient evidence that he fought at Lexington Green or North Bridge. Unit assignments, service dates and the original wording of the record must be examined together.
Battle Outcome & Casualties
British Losses
The National Park Service reports 273 British casualties: 73 killed, 174 wounded and 26 missing. These losses were incurred across the day’s engagements, not exclusively at Lexington or Concord.
Colonial Losses
The National Park Service reports 95 colonial casualties: 49 killed, 41 wounded and 5 missing. Other historical institutions report 93, using 39 wounded. The disagreement should be noted until original casualty returns are compared.
| Force | Killed | Wounded | Missing | Total |
|---|---|---|---|---|
| British regulars | 73 | 174 | 26 | 273 |
| Colonial forces — NPS | 49 | 41 | 5 | 95 |
| Colonial forces — alternative total | 49 | 39 | 5 | 93 |
Assessing the Result
The British reached Concord and conducted searches, but did not suppress colonial military organization. The withdrawal occurred under sustained attack, and the expedition suffered substantial casualties.
Colonial militia demonstrated the ability to mobilize rapidly, concentrate at important locations and threaten a trained expeditionary force along an extended route. The British avoided complete destruction through disciplined resistance, counterattacks and Percy’s relief force.
The result was more complex than a simple battlefield victory. The British completed their withdrawal, while colonial resistance gained a major political and strategic advantage.
Strategic Significance & Aftermath
From Local Fighting to the Siege of Boston
The engagements of April 19 transformed Massachusetts resistance into open war. Militia continued assembling around Boston, and the British garrison became increasingly confined to its defended positions.
The Boston Public Library describes nearly 15,000 colonial militiamen assembled around Boston by the following morning. This figure refers to the growing siege force and should not be confused with the more than 4,000 militia who participated in the fighting on April 19.
How Patriots Presented the Battles
Contemporary Patriot publications portrayed the fighting as evidence of British aggression. These accounts helped transform local military events into a political cause shared across the colonies.
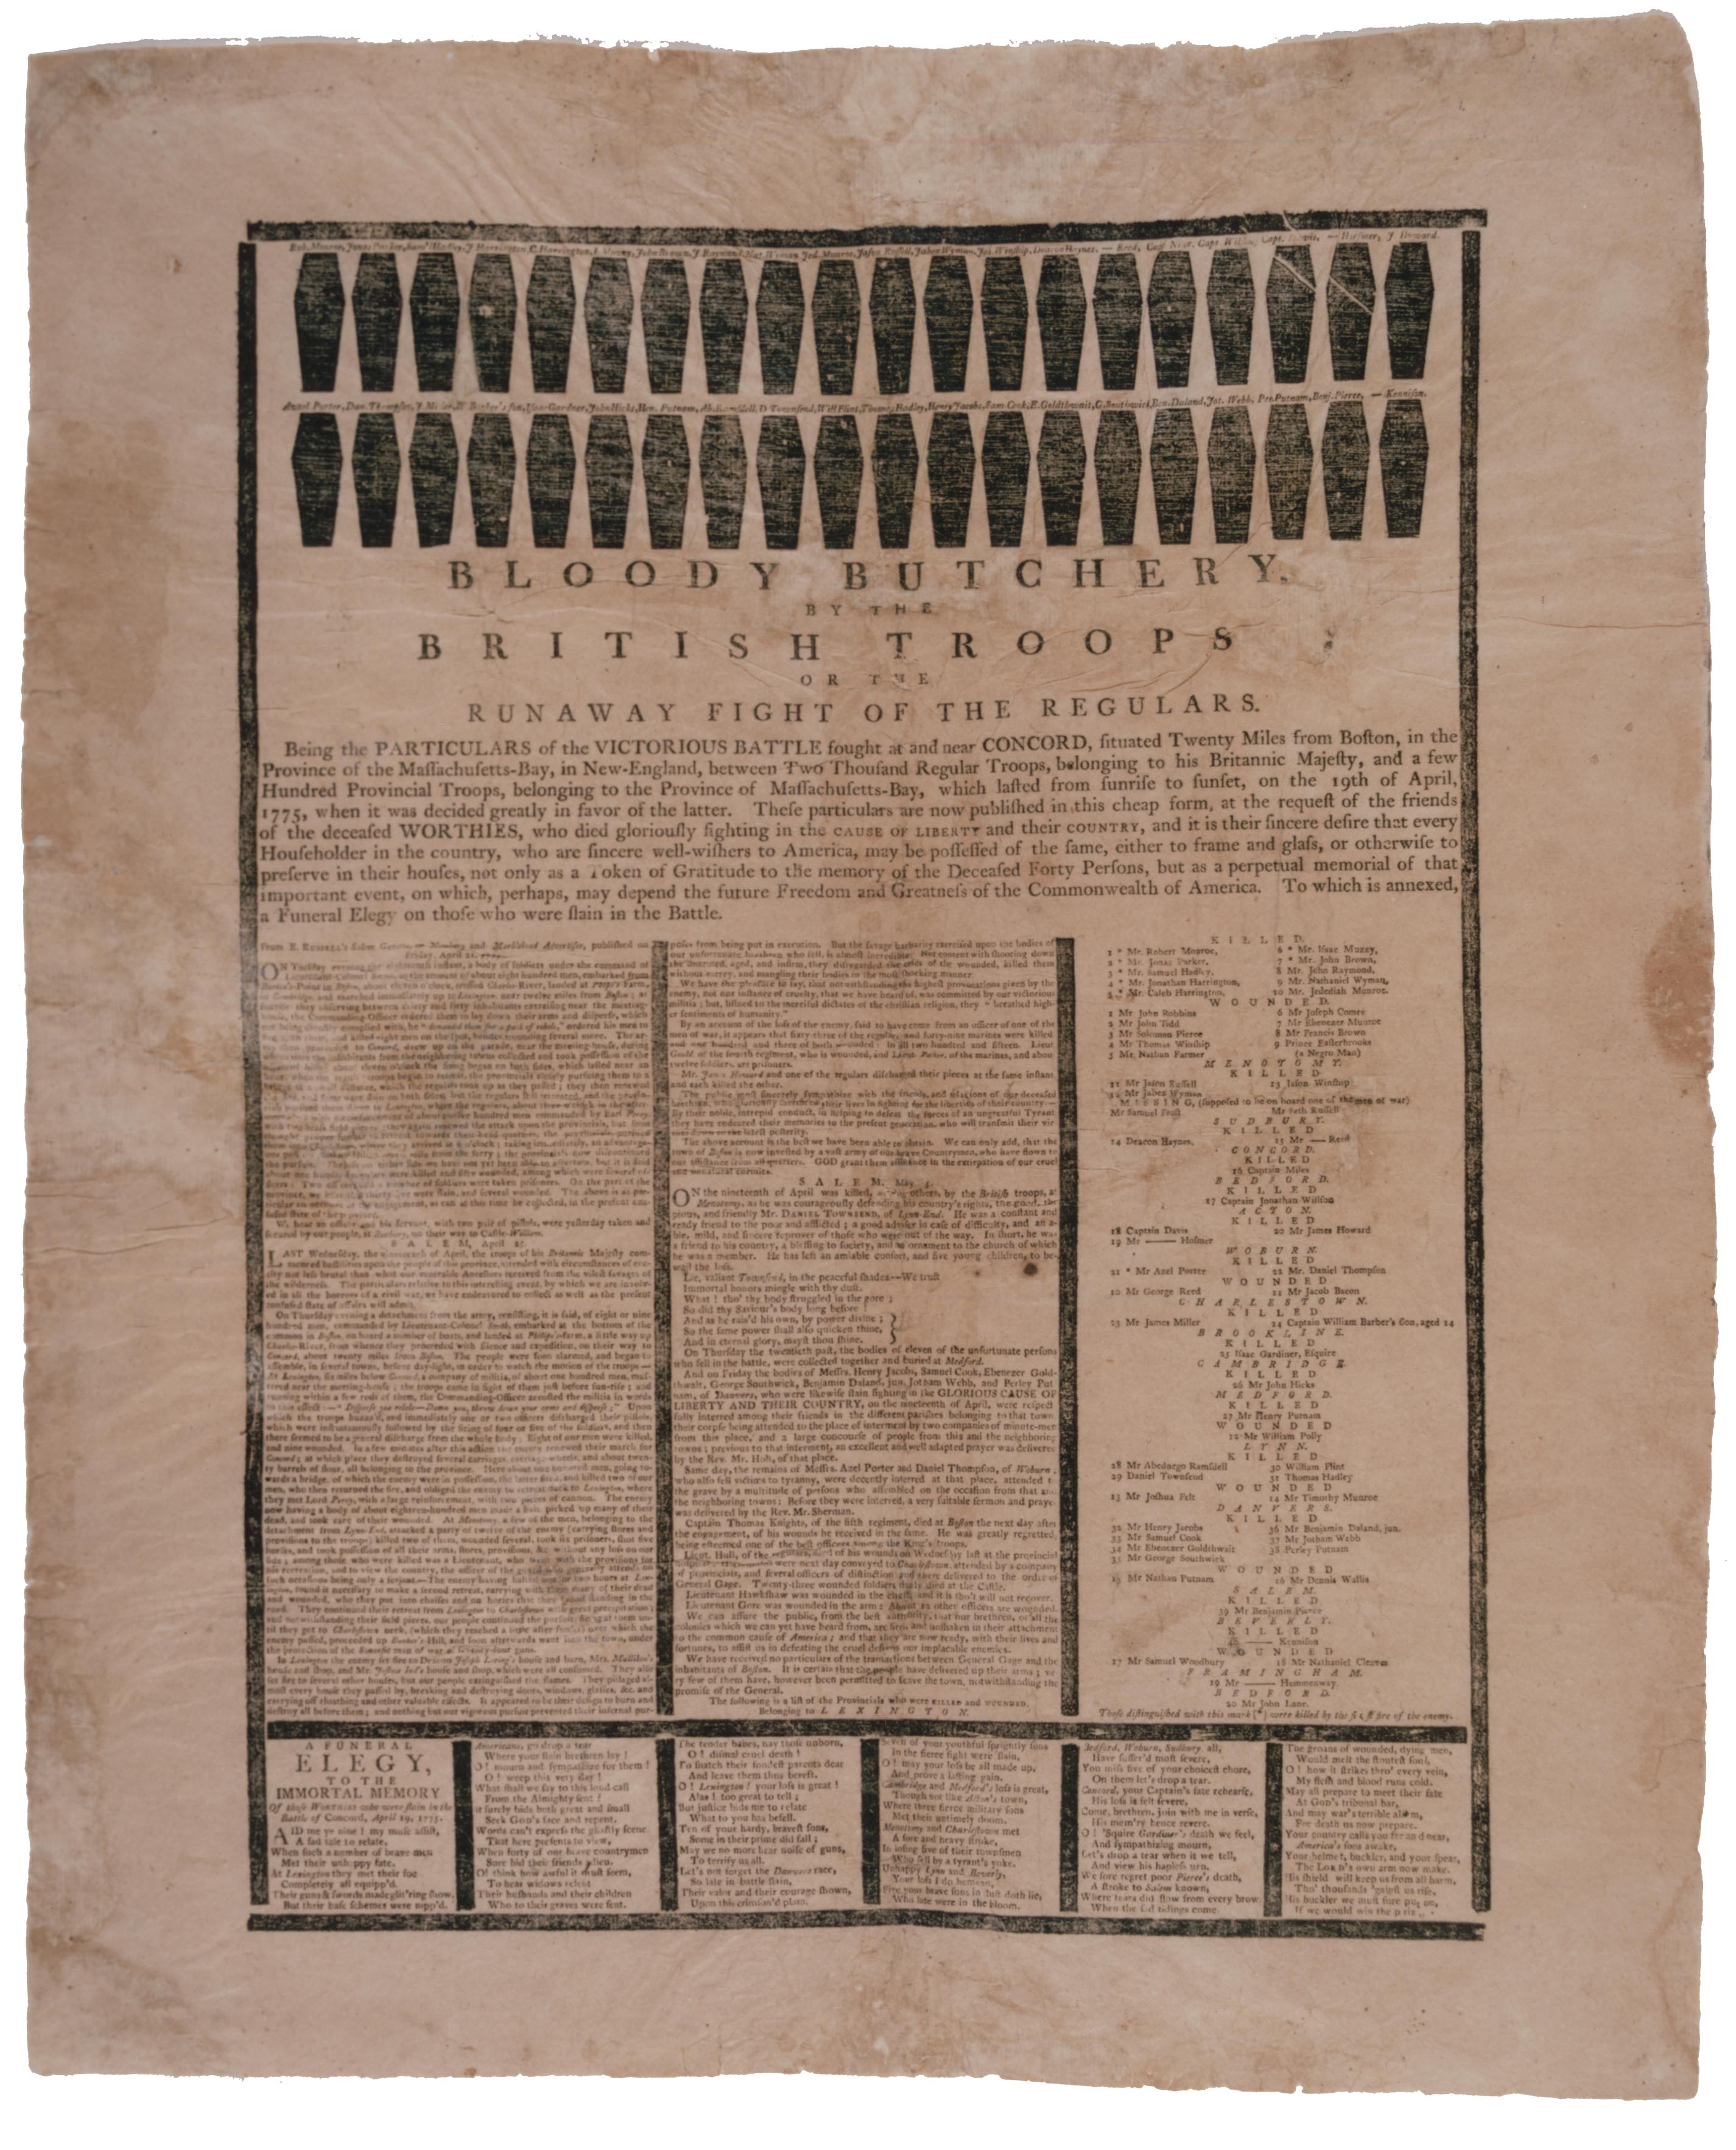
One revealing publication was Ezekiel Russell’s 1775 broadside, Bloody Butchery by the British Troops. Its title and memorial language presented the dead as men who had sacrificed their lives for liberty and their country.
Russell encouraged households to preserve the publication as a remembrance. His purpose was not merely to report troop movements or casualties. He sought to influence how Americans understood the fighting and its significance.
The broadside’s claims about British and colonial troop numbers differ from modern historical reconstructions. Those figures are valuable evidence of contemporary public communication, but should not replace independently reconstructed strengths.
Primary document: Ezekiel Russell, Bloody Butchery by the British Troops .
Who Fired First?
The question of who fired the first shot at Lexington became politically significant almost immediately. Colonial depositions and British accounts offered competing descriptions. Historians must distinguish what individual witnesses reported from what can be established independently.
Later commemorations, including Ralph Waldo Emerson’s Concord Hymn, shaped popular memory. Such works are evidence of remembrance, not substitutes for contemporary military records.
The Human Consequences
The fighting also altered civilian life. Jonathan Hunnewell’s later testimony places his departure from Boston on April 20. His experience illustrates how the outbreak of hostilities affected individuals whose subsequent Revolutionary War service began months later.
Within a day of the expedition, Massachusetts had moved from an unstable political confrontation to a military crisis that would expand into a war for American independence.
Primary Sources & Historical Research
This article distinguishes contemporary evidence from later interpretation. Primary documents establish what witnesses reported, what officers ordered and how contemporaries understood events. They do not automatically resolve conflicting accounts or establish the accuracy of every claim.
Primary Sources
- Isaac Merrill to John Currier, April 19, 1775. Gilder Lehrman Institute of American History, GLC00303. View manuscript . Evidence of militia mobilization and local command discretion.
- Ezekiel Russell, Bloody Butchery by the British Troops, 1775. Gilder Lehrman Institute, GLC04810. View broadside . Evidence of contemporary Patriot interpretation and commemoration.
- Captain John Parker, sworn deposition, April 25, 1775. Referenced in the supplied Parker biography. The original deposition should be checked before quoting its precise wording.
- Paul Revere’s contemporary deposition and later recollections. Referenced in the supplied Revere biography. The accounts should be compared because they were created at different times.
- Contemporary Lexington casualty records. Referenced in the supplied Prince Estabrook biography. Important for establishing named casualties.
- Jonathan Hunnewell pension declaration, October 23, 1841. Referenced in the supplied biography, archival image 4159616_00271. Retrospective testimony concerning departure from Boston on April 20, 1775.
Historical Research and Battlefield Interpretation
- National Park Service, Minute Man National Historical Park. Visit NPS . Battlefield chronology, troop strengths, military organization and casualty totals.
- Boston Public Library, The Battles of Lexington & Concord. Read research guide .
- Boston Public Library, Retreat to Boston. Read research guide .
- Gilder Lehrman Institute of American History, The Battles of Lexington and Concord, 1775. View collection .
- Library of Congress, First Shots of War, 1775. View collection .
- Massachusetts Historical Society, The Siege of Boston. View collection .
- Journey With Murphy, Hancock–Clarke House. Read article . Secondary research lead; anecdotes require corroboration.
Research Limitations
Precise unit positions, some command decisions, the details of Parker’s Revenge, certain ammunition-supply claims and several individual soldiers’ battlefield participation remain subjects for additional archival verification.
The casualty disagreement between published historical institutions is preserved rather than resolved without examining original returns.
Linked Yost Post soldier biographies provide individual context. Where a biography relies on retrospective testimony or a referenced but unexamined muster roll, this article identifies the resulting uncertainty.
Documented military service, participation in the Lexington alarm and direct involvement in a particular engagement are separate historical claims. Each requires appropriate supporting evidence.